Taurus Car Club of America : Ford Taurus Forum banner

Roach's Ultimate Guide to Crystal Clear Headlights

7.5K views 33 replies 20 participants last post by  jopower  
#1 ·
I've always been on the hunt for amazing crystal clear headlights that look brand new, so I've tried everything and anything I could to brighten mine up.

So from my past experience, I've found the ultimate solution. Please don't read on if you hate disappointment.


What you'll need:

Toothpaste
Sandpaper, 300grit-2000grit
Water
Elbow Grease
Run-of-the-mill headlight cleaner/restorer
UV Sealant/protector
Coca-Cola


What you do:

Take the toothpaste, sandpaper, water, headlight cleaner and UV protector and throw it away.

Drink the Coke and buy new headlights.


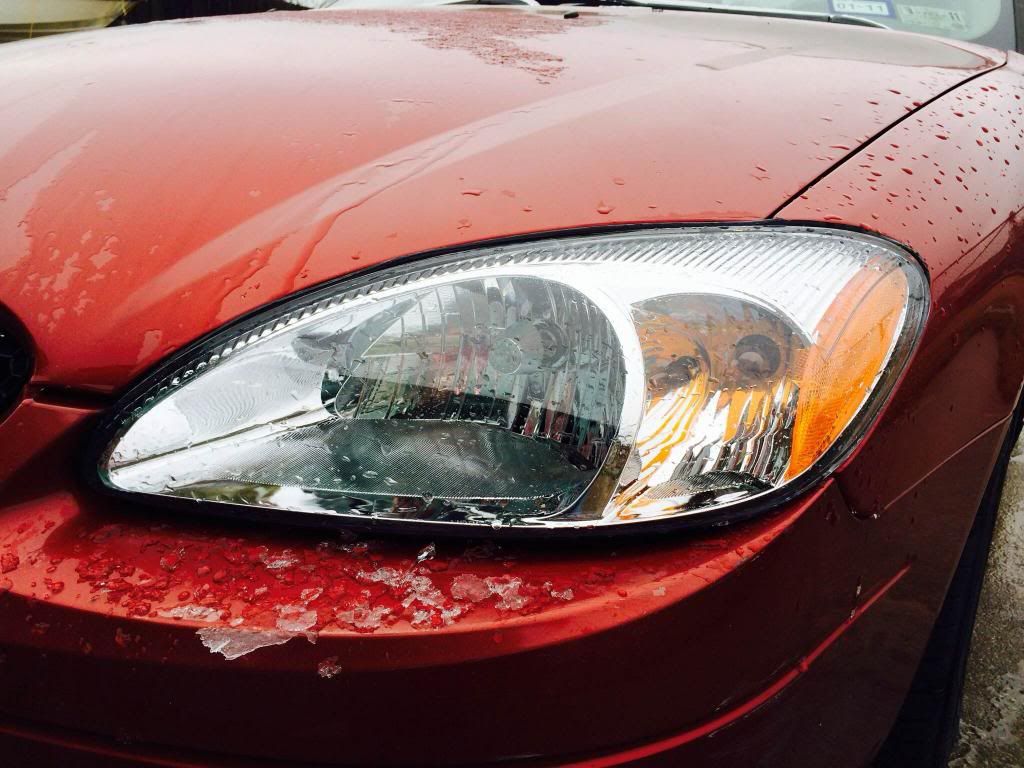
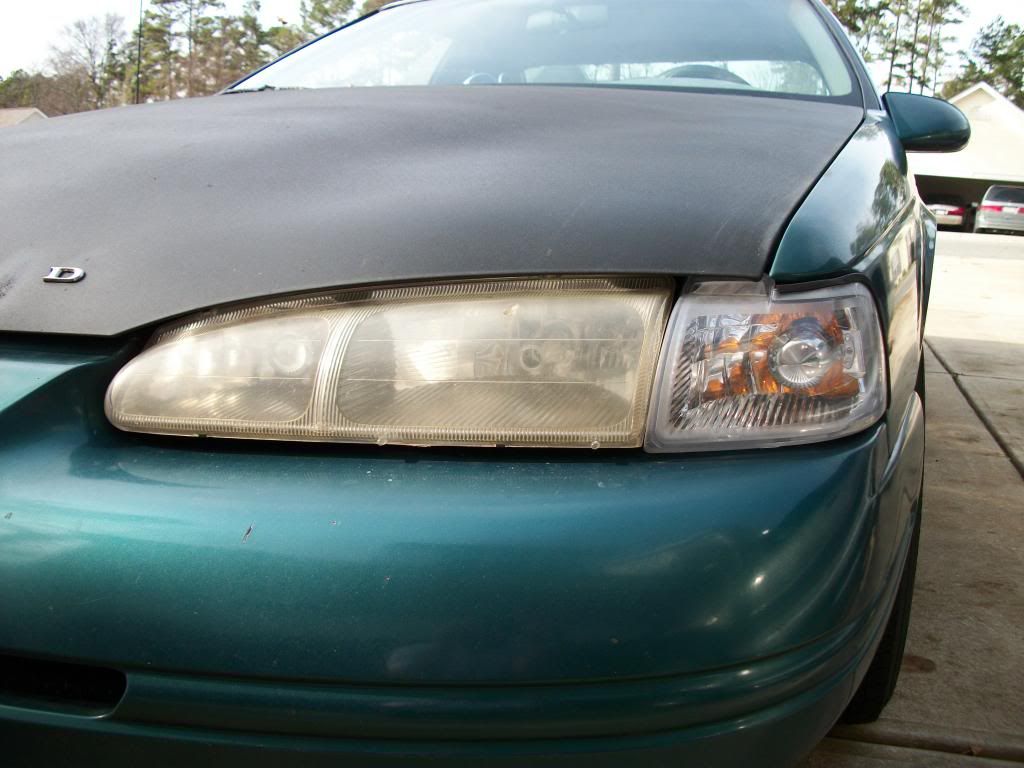
This is my car after using every possible solution to clear them up:

Image


They looked great, but not by comparison. They're still faded and dull. [This picture makes them look better.

After I got clear corners, they stood out really bad.

Image


So I heard of that UV protector crap, and after another 4 hours clearing the headlights to a mediocre "clear", I applied some of that stuff.

Three weeks later.

Image


They yellowed even more than they were before. I at least had them white and foggy at one point, I think.

So I gave up. I couldn't see crap at night though, the Tbirds lights are not that well designed.

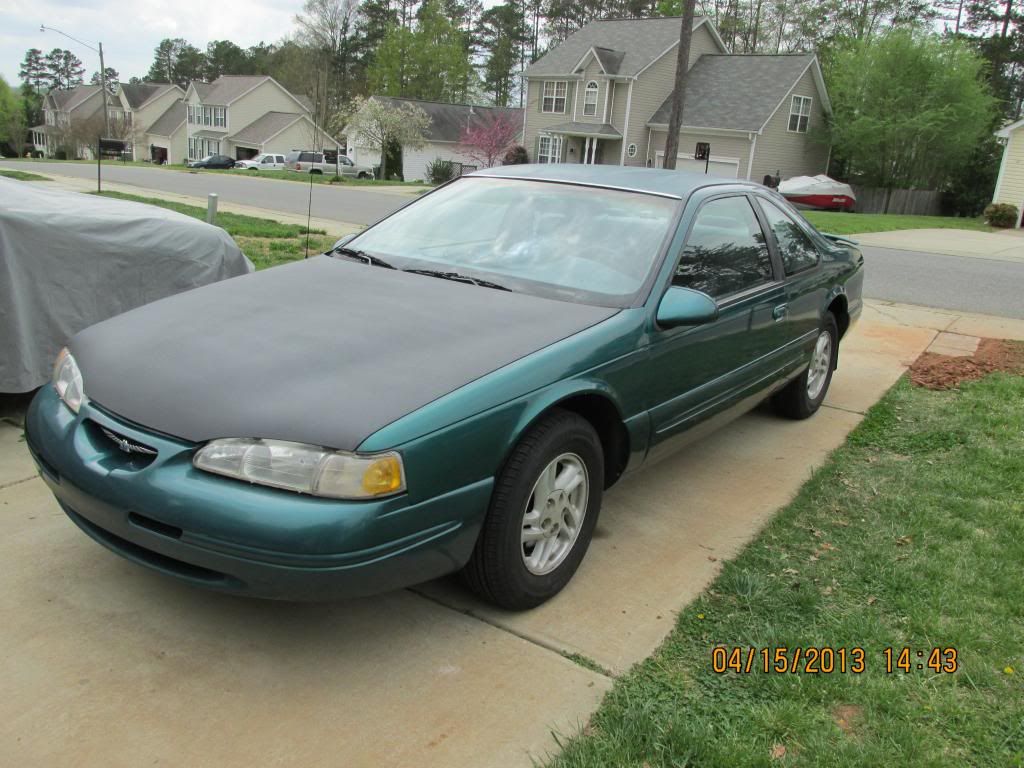
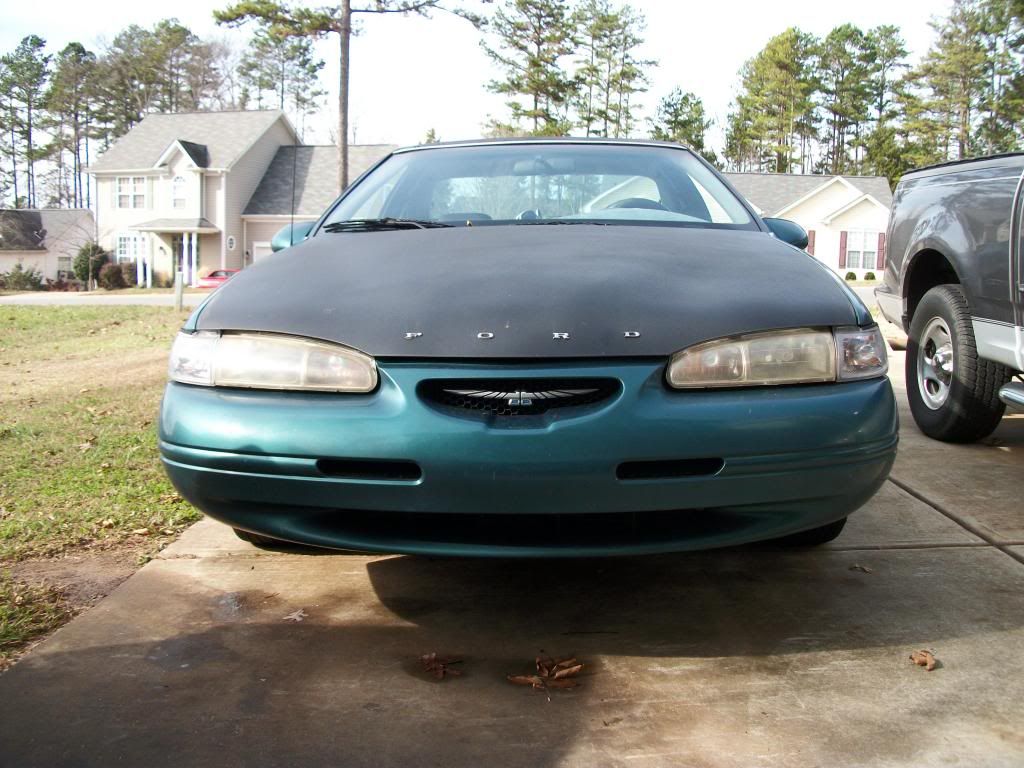
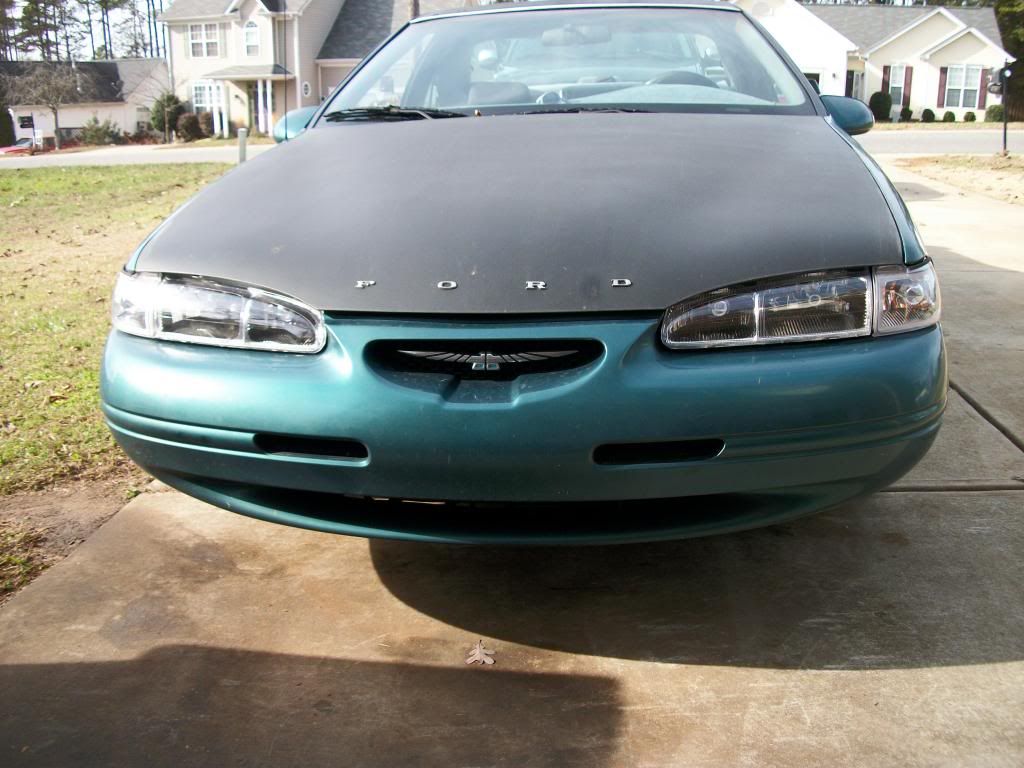
So I finally got new housings.

Image


I had the same issue with my Taurus. [Before I got two new headlights for a retrofit] One of the lights got busted, so I bought a new one, well that other side was always noticeable no matter how clear I got it.

In the end, there is no replacement for....replacement.
 
#5 ·
Before I brought it there I cleaned them up and buffed them with an orbital buffer. They were pretty good at that point, but still noticeable to the corners.

Oddly, mine are still clear after ten years on the road.
Clear, and like new clear are different. A very slight haze could be on yours but without reference to a clearer lens you may not notice it. Or you have some godly talent on keeping them that way.

Roach, can you substitute beer for Coke???
Technically that's not following the how to steps, but I guess it will work. :lol2:
 
#4 ·
Oddly, mine are still clear after ten years on the road.
 
  • Like
Reactions: WoodyCA
#6 ·
Image


I don't know, they're pretty clear!

There is some wear on the crease in the headlamps, however. But more than acceptable for 10 years. My parent's '05 Odyssey's lamps were solid yellow after six.
 
#8 ·
I used to use the kits and some of them are good but they only last a month or two then they turn yellow again, I ended up buying new headlights for less than $55 for the pair and it was a huge difference for not so much money :)
 
#9 ·
The headlights on my 05 SEL are still crystal clear except for a few stone nicks, and the 05 is kept outside 24/7/365. The headlights on the wifes garage kept 04 SES are getting cloudy and yellowing, and will likely need replacement next year. Go figure.
 
#12 ·
You could very well be right, Brad. I take pride in all my "personal" cars, and wash them all very regularly and wax them all every 2 to 3 months, including waxing head and tail lights. The wife doesnt care about a cars appearance.... if it starts and runs, heat works in the winter, AC works in the summer, thats all she cares about. Hers is lucky to get washed once every few months (by me, when I cant stand looking at how filthy it is), and waxed maybe once a year (again by me, when I cant stand how dull it is starting to look).
 
#11 · (Edited)
Wow, I thought the guide was serious at first.. A few weeks ago I wet sanded down my headlamps, put some polish and cleaner wax on. Wish I had a before shot.. Although I do need to go over them again with sandpaper evenly and then use the 3K grit I just bought. Cheap solution to buying new housings, atleast until the permanent damage sets in XD.

Image


Left one is glaring from the sun grrr
 
#13 · (Edited)
I wash them more in the summer. I haven't had the heart to wash as regularly over the past few months because it was picking season, and the car would be coated with dust after a day. Right now it looks horrible because with the nightly freezes, when that thaws it just collects the dirt in the air and leaves nice splotches on the car.

Plus I only have 75 cents in quarters, and I need $1.25 to wash it. :/

And I don't like taking it through automatics.
 
#14 ·
I think that part of the reason headlights yellow quickly up north is because of the amount of salt and chemicals put on the road for ice melt. It's worse for cars over SUVS. My Taurus, my old Taurus, and my brother's Prizm all had fading headlights, while my parents SUV and truck (higher headlights, less splatter from the cars in front of them) aren't yellowing at all.
 
#20 ·
True, I hadn't necessarily thought of that. But I'm pretty sure the salt and other ice-melt increases the yellowing rate.

But don't you have to re-aim/align them after replacement? Sounds more of a PITA..
Aiming them is pretty easy, though.
 
#16 ·
Not just southern cars... When my mom rear ended a Toyota 4 years ago in her Grand Caravan, her headlight needed to be replaced, so we bought a like new one from the junkyard. In less than a year, it was faded to the point where it was looking worse than the one that hadn't been replaced. We ended up buying new headlights from Amazon, and 3 years later, they're about 1/2 way to the point where we replaced them last time.

The van gets washed once every 2 weeks in the summer, once every 3 weeks in the winter. I constantly polish and buff out the headlights, and they fade back again.

It's really a never ending battle with these things. :p
 
#17 ·
Well, those are third party lights, and its a Chrysler product, so that makes the case different.
 
#21 ·
We bought an OEM Chrysler set on Amazon. And what made you so sour towards Mopar products?
 
#18 ·
The headlights on my 2000 SES with 168k miles after 10 minutes of work. (We just had an ice storm so they're a little dirty):

Image


My secret?

$70 to Rock Auto for the pair of new housings. I'm with Roach on this one. I'm all for DIY, but it hasn't been worth it for me with most headlights. For the amount of effort it takes to restore them, and the little amount of time they stay looking restored, just replace the darn things and be done with it.
 
#23 ·
My 10 minutes to change them included re-aiming. The Gen 4's are easy as can be to swap the housings. Remove one bolt, pull two pins then remove the bulbs after you pull the housings out. Install the bulbs in the new housing, then re-install the housing with the bolt and the two pins. The only aiming adjustment is height, and it couldn't be much easier to adjust.

The Gen 3's are just as easy. Remove 3 bolts and loosen one. They even have a bubble level to help you aim them.

Compared to the effort required to buff yellowed/faded headlights, and the short amount of time they stay nice once you do so, I'll just change them. Once the UV coating is gone, you're fighting an uphill battle and the aftermarket coatings I've tried are junk. Of course, your mileage may vary.
 
#25 ·
I don't have a local boneyard. Which sucks, because I need a replacement door for a 2000 Chevy C2500HD
 
#27 ·
Our 1999 Taurus never yellowed, my 2006 and 2005 Taurus never yellowed, and our 2002 Windstar did not either.

Many imports suffer from yellowing around here though.
 
#28 ·
Were these all garaged? Or at least parked in the shade often? UV exposure seems to be what does it. The headlights on my '00 looked great until she got booted from the garage. They went downhill fast after that, as did the clear-coat.
 
#30 ·
I too gave in and got new headlights for Christmas, they're on backorder so they''ll be here soon... I''ll update when I get them

Sent from Josh's LG Optimus F6
 
#31 ·
Ordered what had a picture of centennial lights on Amazon...

They were not centennial lights. So now I've got the same exact thing as before, just without the cloudiness.
 
#32 ·
Give a bad review or contact the seller...

Sent from Josh's LG Optimus F6
 
#33 ·
I know I'm reviving an old thread, but I had this going on myself, what worked for me was a trick my dad told me, which was use rubbing compound.

A few months ago I tried doing the toothpaste fix which seemed to help a little, but they started getting yellow again. Tonight I redid them with rubbing compound, the 2 dollar turtlewax paste in green can. Anyway, after redoing them, to me they look almost new. Much clearer than before. I used a little eagle 1 wax as you dry wax to try to seal them a little.

This may not work depending how your lights are. My wife's 06 stratus on the other hand had hazy headlights also, this method did not work well on her headlights. They improved but still have haze almost like they burned on the inside, but on the 2000 Taurus, worked great for me.
 
#34 ·
My 1992 Tempo had yellowing and the surface had a bit of flaking. It did sit facing the sun all day to warm the seats and engine in winter.

I had decent results with this sequence: 0) tape off the whole area around the light with card stock or heavy plastic sheeting. 1) Wet sanding with 220 grit. 2) Wet sanding with 1000 emery cloth. 3) Buffing with polishing compound. 4) Finish with plastic protectant to seal them (same stuff as I used on my motorcycle helmet and shield to shed water easily). This was good for 2 years at 5000 feet in Colorado at 10k miles/yr in all weathers. Then had to repeat. No, didn't look new, but pretty decent for using only what was at hand in the shop. Yes, I did use a palm sander to ease the task. The water was in a reused dishsoap bottle for easy squirting, some drops of soap remained so it was a bit sudsy. I was very careful to keep the water away from the sander... no shocking results!!

I have heard some possible results with acetone or model plastic glue (which is a gelled form of something like acetone). The solvents are said to resurface the plastic. I think some kind of smoothing applicator is necessary for a good finish. The dealers are said to use some such combo.

Of course you could go all Frankenstein and saber saw the lens face off. Then screw-n-glue on some hard surface Lexan. THAT should last a while! :D